thumbnail

Toymaker versus DC23 face-off WIP - big butt!


As most of you know I am not good in scratch building, It was a bit of surprise for me though that I kinda pulled off at least the basic shape of the main part of my The O II conversion. I think more or else I was able to get the shape I was aiming for. I just need to pile pla plates or put putty on the damaged corners and sand it smooth and curvy. A visible crack on both sides will also need some reinforcement on the inside and a bit of putty work outside.


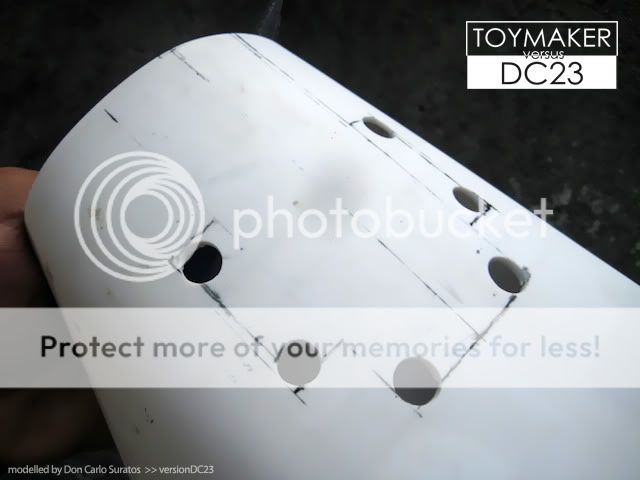
The main obstacle of the but is the big hole that I was luckily able to achieve. The layers of .5mm pla plates I added last night was able to make the shell really strong and thick on some of the crucial curved areas. I was aiming for the hole for the main engine block at the butt, much like what you see in the photo below...


Now here are a few more photos on how I as able to achieve the hole for the main engine block...


First I bored large holes on the corners coz I do not want sharp corners in this build. I think I will be sanding down any corners so that the overall look is nice and curvy. After drilling the large holes, I sort of connected the dots with my Tamiya scriber and sawed it off. I was really afraid while I was doing this as the butt might lose it's curves once I have removed a significant amount of support.


Gladly all those layers of .5mm pla plates that I layed down hardened to form a thick 2-3 mm shell at the most crucial parts. The shell retained it's shape even after I have remove the hole where the main engine block will be placed. Voila! I have the main shape and the biggest scratch building hurdle of my The O II conversion is done.


I will be leaving this butt as it is as I will work on the MG Zeta now. Plus one of the main features of this build is the butt, thus I do not want to rush and finish early. I also need to research a bit further on how I would do the engine blocks, the details underneath the butt and the detailing and modifications of the butt itself.


I will now sit back and wait for Toymaker's first update. ;)


Thanks for dropping by! Til' next post! :)


thumbnail

Toymaker versus DC23 face-off WIP - basic butt shape


I wanted to start on this project a bit for a couple of days now but I eventually gave in to the urge after seeing this thread at ZeroGunz! Initially Kenny Lim aka Toymaker and I agreed to build a conversion of the O II Hauer. Kenny eventually thought of creating and designing his own version as he mentioned in his post. Our initial take off date is June 2011, but I just had to ride the mood to at least build the basic shape of the butt.


I had a chat with Kenny earlier today and I asked if I could start building mine which is 3 months earlier than the original date. He told me it is ok but he can't start on his own yet, I just feel I had to ask his permission as I think working on it earlier than the agreed date would be cheating.


I won't be working much on this kit though as I still have a lot of other Gunpla projects. As I've said, I just have to ride the mood and at least build the basic shape of the butt of the O II Hauer. Anyways, this is made of a 1mm pla plate that was forcefully bended to form the shape.


The butt of my The O II will be 8 inches long, 5 inches wide on the widest part and 3 1/2 inches on the tallest part. I have reinforced the basic shape with strips of .5mm pla plates to help retain the shape of the butt. I will have to pile up or build up on the pla plate strips to make sure the shape is intact once I remove the tapes and clamps.


I hope to build up enough .5mm pla plate strips and form a really hard shell once the cement has cured. Once I have the shell, I could do anything with it as I won't worry with the butt loosing it's shape anymore. Now here are a handful of photos showing the basic shape of the butt...


Thanks for dropping by! Til' next post! :)


EDIT: I laid down and piled up more .5mm pla plate strips after dinner, and I have used 2 a4 sized sheets of Tamiya plates. I think this will be really strong by tomorrow morning when the cement has cured on the layers of pla plates.


However I did some experiment and added a thick layer of Epoxy on the corners. I am pretty confident that unlike Tamiya putty, the epoxy won't melt the pla plates and it will give me a stronger material once it has cured in 2 - 3 days.


I am now thinking of putting a thin layer of epoxy all through out the inner side of the butt. I am basically just making sure that I would come up with a really hard shell so that I can do anything with it in terms of modifications and detailing. A hard shell would allow me to bore large holes, cut some parts and scribe panel lines without worrying that the butt would lose it's shape.


P.S. I got the idea of using epoxy from my post of the StarCraft Marine construction by Flanela


As always, thanks for dropping by! Til' next update! :)


thumbnail

MAC's concept MECHA GB is heating up!


Our concept MECHA Group Build is heating up guys! A handful have finished their builds already and as a modeler finishes his entry, I immediately post it in my concept MECHA GB gallery. The other 15+ modelers are still working on their entries though and are filling up the workshop section in our forums!


I am blown away everyday with the amount of creative and unique builds we are seeing in the workshop section right now. A handful of really nice walkers, a few wheelers, some small robot critters and even a furture marine! I highly suggest you join our GB or at least visit the nice WIP threads in the forums. Here is the link to the workshop section of our MAC forums...

MAC's concept MECHA GB WIP threads


thumbnail

MAN Elmeth 08 - Solomon Express WIP - modeling by Ronnie Phoon


I just saw this outrageous scratch building work in progress thread at Zerogunz a couple of days ago and felt I had to feature it as I find it really inspiring! This build is by Ronnie Phoon aka Phoon, a fellow moderator and modeler at ZeroGunz and is a very very good modeler from Malaysia.


I can't really say that Phoon has outdone himself as he brought his architecture background to the table when he started this hobby. Another scratch building wizard who loves weathered builds and is really good at it. This build is for the Femme Fatale GB in ZeroGunz that was started by Beckylaw.


Phoon is not that active in the Blogosphere though, but he updates his blog a bit regularly... now here is the link to his current SB project for the ZeroGunz Femme Fatale GB...

MAN Elmeth 08: Solomon Express - modeling by Ronnie Phoon


thumbnail

BFG of the MG Zeta - mods almost done


I managed to work on the BFG of the MG Zeta yesterday. The BFG is made popular by Eday and also Izzaku when he won as BMKWC World Champion back in 2009. A lot of modelers has followed suit  but I have really no intention of following too as that is their style. However my client requested for one and this is actually my first BFG and I had a bit of fun working with it.


Being my first Big Gun, my 2 daughters kept on asking me while I was working with it,  why the Gun is bigger than the robot, how would the thin robot carry the gun and why does the robot like to have a big gun? Anyways I had to come up with good answers then they agreed that the robot needs a really big gun eventually. 


Not really confident on how it looks like now as I only slapped on 3 guns together, added some pla plates, holes and some Kotobukiya option parts. I hope this looks better after priming and my client would approve it. Anyways, here are some photos so far...


Thanks for dropping by! Til' next update! :)


thumbnail

1/72 WAVE Destroid Tomahawk modeled by Decay


I have been a bit more interested in non-Gunpla stuffs these days and there are a lot of non-Gunpla Mecha WIP threads in the forums. However this completed 1/72 Destroid Tomahawk blew me away when I saw it! This was modeled by one of our active members William Decay aka decay.


Decay is a very experienced modeler as I saw some of his old ( 2002 - 03 ) painted Lord of the Rings table top figures in the forums. I have also featured him here in my blog before when he posted his beautiful highly detailed MG EX-S Gundam, which is one of the best MG EX-S I've seen so far.


This 1/72 Destroid blew me away as I was caught unexpected! He did not have any WIPs on this one as he considered this as a relax build. This is not a relax build for me as I think this is BMKWC level already! Both the kits and the diorama are masterpieces on their own and it is just a treat to look at those very nice moody photos!


Tons more photos that I highly recommend is in our MAC Forums diorama section...

1/72 WAVE Destroid Tomahawk modeled by Decay


thumbnail

Hasbro X-Wing Red 5 repaint by Ryukaze


Izham Ryukaze or simply Ryukaze is the founder and creator of ZeroGunz. He left a comment on my 1/72 Finemolds X-wing kit about adding some " space dust " to the kit to give it a nice space used weathered look. He then told me to look for his Hasbro X-Wing in his blog.


As I've told him, it took me roughly around 30 minutes to find his X-Wing in his archives. Gladly he has now added a search box on top of his blog today so re-finding his X-Wing was a ton easier. I have seen Ryukaze's repaints on some TF toys that looks really good, however I never thought that even Star Wars toys could be repainted and made to look as good as this.


I am hunting a bit on some Star Wars kits after the 1/72 X-Wing as I felt I could do better on my next. But I figured I'll just hunt for a Star Wars Hasbro toy and have it repainted and weathered much like Ryukaze's X-Wing. Ryu actually had to painstakingly mask and paint the X-Wing's markings to convert it to Luke's Red 5 but the hard work looks like its well worth it.


The shading is a ton better than mine, the " space dust " effect looks like a charm and the weathering and washes is just perfect. Tons of photos of this beautiful repaint in Ryukaze's blog and  I highly recommend you visit it, here is the link guys...


thumbnail

Gratz to Tember Gundam for a year of Gunpla!


Just got home from the office and I feel a bit better now. I actually fell asleep for a couple of hours in the office ( do not tell my boss ) as I was up since 5 am today. Anyways, I highly doubt I'll be having some rant posts for at least another fe months... haiz.


Anyways, I just want to extend my greetings to one of our long time MAC Facebook member and fellow blogger and Gunplar, Russel Hutchison aka Tember Gundam. Russel has been enjoying this hobby for a year now and has been a member of both MAC forums and Facebook since its conception.


He is pretty known for both his wild and unique color schemes for both the MG Sinanju and MG The O. More photos of all the kits he completed in his first year is in his blog. Do visit if you have the time and here is the link...

A year of Gunpla for Tember Gundam


thumbnail

cheap Metal parts for modding!


My sincerest apologies to my readers and friends for the series of " rant " posts these past few days. This blog is a happy place for me but I always get pissed off by disrespectful, full of themselves people. And as it is obvious by now, I back up my friends no matter what. I do realize however that I have a ton more followers and friends and should have never stooped down to that level.


On a lighter note, I just wanted to put up a quick post on some really cheap metal parts I bought last night. As much as I want to take credit for discovering the probable use of these spiky earrings for Zeon kit modifications, I heard these spiky " Emo " earrings from John David Ceremonia aka DAVIME.


I am 14 years older than John David ( he is 17 now ) but I am proud to say that I learned something from the young guy. You see, we could all learn from each other and we could not only learn from the Pros and older people bur also from the younger modelers who are just starting to " enjoy " the hobby.


I might add a few more photos of these earrings later, but I have to go to work now. Cya guys, Just enjoy the hobby as always! til' next post!


thumbnail

Vulne Pro - Mecha Design Studio


Vulne Pro followed my blog a few days ago and I always check my follower's blog. I usually follow them back ( if I like it so much ) and I always add them to my blog roll. I always make it a point to check the sites in my blog roll as most posts, mecha, models or not are really inspiring. 


Vulne Pro is basically a Mecha Design Studio that focuses on television, web and print media. This is a highly inspirational blog full of very creative fictional and mechanical designs. I sure did got inspired from their posts already and I highly recommend you visit or even follow the site.


I also saw some nifty hangar background designs aside from the great mecha creations, now here is the link to this very inspiring blog...


thumbnail

Starcraft ZERG Hydralisk 1/30 model kit repaint


This is basically the base for my ongoing 1/30 StarCraft Terran Marine kit but I thought of putting up a separate gallery for it. This Zerg Hydralisk kit was painted way back 1996 and I just hand painted the Zerg back then using Reeves acrylics.


I painted this kit with Tamiya acrylics, mainly dark yellow as the main color, some browns and blacks for the skin patterns and post shading, some clear red and clear green to give the skin additional color tints, some Tamiya enamel washes, detail painted the teeth and eyes with Citadel paints and sealed with Pledge Wipe and Shine ( red variant ).


I particularly liked the RED future as the final gloss coat as you can see it settled on the crevices thus it also served as a filter. I initially wanted the ground work to be lighter to make the Zerg pop out more, but soon realized that sealing the ground work in flat coat is enough to make the glossy/ slimy Zerg stand out already. 


Anyways here are some photos of the completed Zerg...


I am not sure if I'll be working with the Terran kit soon coz I really have to go back to working with my MG Zeta commish. I ran out of Enamel thinner ( Zippo ) though so I should be working on the kit itself instead of weathering the diorama.


Now here are a few photos of the Terran on top of the dead Zerg Hydralisk. I hope to finish this after the MG Zeta...


Thanks for dropping by! Til' next update! :)


Powered by Blogger.