Showing posts with label 1/48. Show all posts
thumbnail

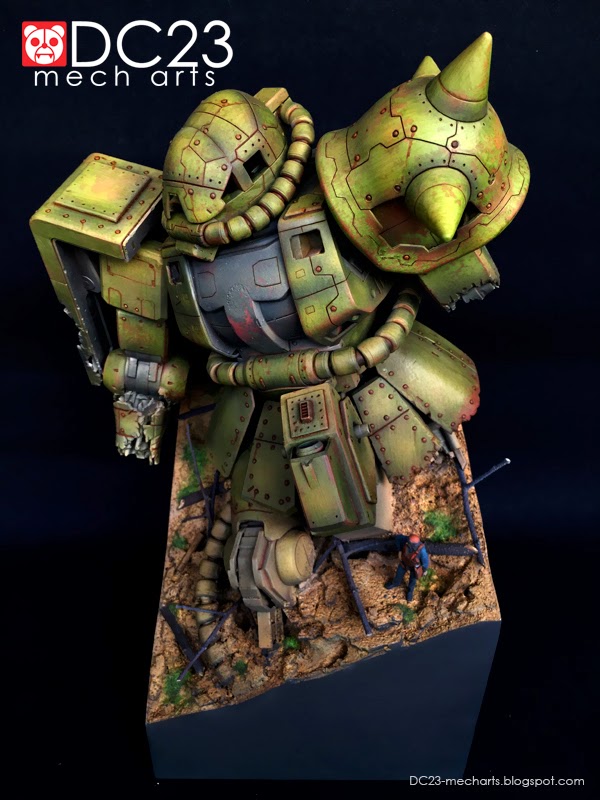
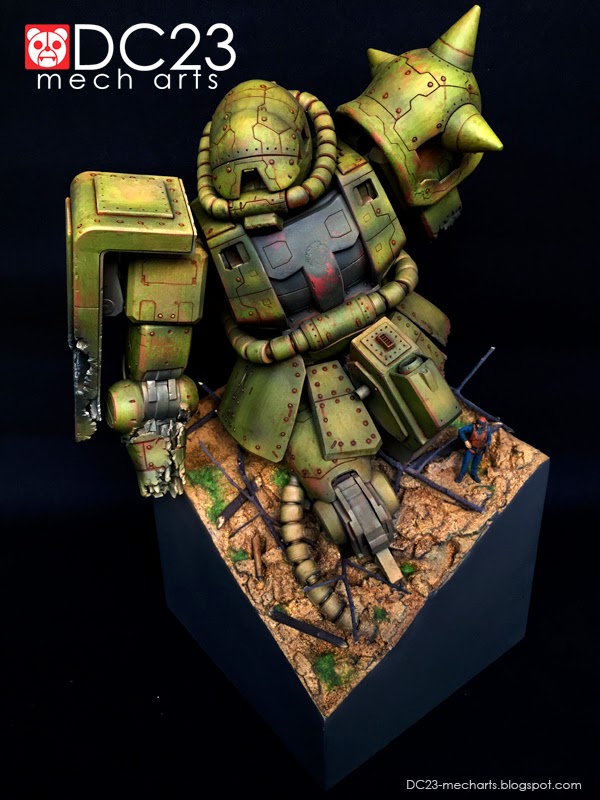
1/48 Mega Scale Zaku Diorama " Dead Turtle " modeled by Don Suratos akaDC23


Mega Scale Zaku Diorama Dead Turtle modeled by Don Suratos akaDC23photo


Just finished this piece today. I wanted to finish something quick to start the year on a productive good note. This was my old sponsored 1/48 Zaku kit I got from Greattoysonline.com way back. I originally plan to use this for a huge hangar diorama, but I just cannot find enough materials ( 1mm rods and tubes ) to work on that project.


I was working on a few commissioned works during the December holidays ( MG Zeta Karaba and MG Z'gok ) but I really felt like rushing and painting something quick to start the year with a conpleted work. So I ended up finishing this quick painting project.


As you can see, I wanted to paint it as soon as possible thus I failed to detail the other parts to match the detailing of the head and shoulder armors. I did manage to add a gazillion of rivet work all over the kit to somehow give it a consistent look. The rivets used were cheap sewing pins which is not as easy to install ( you need tweezers ) as it looks. I also failed to add battle damage to the amputated right leg as I really wanted to paint already.


Although I feel I could have done more modifications and worked with this kit for another week, at least I had so much fun painting this with my old stock of Vallejo paints and washes before the holidays end and before I report back to my dayjob.


The kit was primed with Vallejo Grey Surface Primer, Vallejo Rust colored Model Colors, some Vallejo Game Colors and Vallejo Model Airs. The kit was weathered with Vallejo washes, inks and pigments and the kit was sealed with Vallejo Satin Varnish! Dang I love my non-toxic Acrylic paints ( lol )!


I really like the flat look of the Vallejo Satin Varnish. It has a very subtle sheen rather than a really chalky flat look! You just need to mix around 10% of Vallejo airbrush thinner to make the varnish more suitable for airbrush use.


I learned and re-learned a lot of weathering techniques with this build. Much like the modifications, I could paint this for another week, but felt the kit has served its purpose already.. now moving on to my other projects. 


Hope you like this post ( will edit this post and add gazillion of photos soon ).


Thanks as always for dropping by! Until next post guys! Just enjoy the hobby! :)


Mega Scale Zaku Diorama Dead Turtle modeled by Don Suratos akaDC23photo


Mega Scale Zaku Diorama Dead Turtle modeled by Don Suratos akaDC23photo


Mega Scale Zaku Diorama Dead Turtle modeled by Don Suratos akaDC23photo


Mega Scale Zaku Diorama Dead Turtle modeled by Don Suratos akaDC23photo


Mega Scale Zaku Diorama Dead Turtle modeled by Don Suratos akaDC23photo


Mega Scale Zaku Diorama Dead Turtle modeled by Don Suratos akaDC23photo


Mega Scale Zaku Diorama Dead Turtle modeled by Don Suratos akaDC23photo


Mega Scale Zaku Diorama Dead Turtle modeled by Don Suratos akaDC23photo


Mega Scale Zaku Diorama Dead Turtle modeled by Don Suratos akaDC23photo


Mega Scale Zaku Diorama Dead Turtle modeled by Don Suratos akaDC23photo


Mega Scale Zaku Diorama Dead Turtle modeled by Don Suratos akaDC23photo


Mega Scale Zaku Diorama Dead Turtle modeled by Don Suratos akaDC23photo


Mega Scale Zaku Diorama Dead Turtle modeled by Don Suratos akaDC23photo


Mega Scale Zaku Diorama Dead Turtle modeled by Don Suratos akaDC23photo


Mega Scale Zaku Diorama Dead Turtle modeled by Don Suratos akaDC23photo


thumbnail

1/48 Mega Scale Zaku verDC23 Primed


I just finished priming this old project. I wanted to finish a kit before I report back to work on Monday and to make a good start to 2015. I did not want to rush my MG Z'Gok and MG Zeta Karaba just to finish something as both are commissioned works.

I got lazy and stopped detailing this project today as I want to paint and weather this already. Although I have colds since Monday, I hope to finish this project soon. This should be basically a weathering practice kit for me and hope to pull off better weathering on this kit. 

The diorama or base is entirely made of styrene and textured with Vallejo texture paints. The kit is primed with Vallejo White Polyurethane Primer as usual. 

Thanks as always for dropping by! Until next update guys! Just enjoy the hobby! :)


thumbnail

1/48 ZAKU project WIP - quick initial mods


1/48 ZAKU project WIP photo


Just wanted to share some quick work I have done on my 1/48 Mega Size Zaku I got from GreattoysOnline.com. The original plan was just to straight build the kit, remove seam lines and place on top of a diorama as inspired by Julius Lim's 1/48 Zaku diorama " LOST ".


However I thought of doing some quick scratch building for the waist of the Zaku to practice for my future sbing projects. I always dislike the short skirts of the Zaku as it looks like girlie skirts or boxer shorts. The Zaku skirts just looks too revealing for me.


So I decided to add another layer of skirts to the existing skirts. Note that instead of replacing the existing skirts, I added another layer which adds up to the complexity of the overall look. The sb'ed skirts does not totally cover the original skirt armors thus giving it a layered armor. I also did a quick crotch for the kit as I also find the original crotch not too manly enough. The butt skirt was also extended and might bulk it up a bit with either putty or more pla plates.


Aside from the white scratch built parts, and the tedious seam line removal. I re-drilled the holes all over the kit as they look too shallow. I also removed a section on the left shoulder armor and have yet to decide what to put in it. A mesh is the quickest way to cover that or layering of pla plates. Notice also that I sawed portions of the head part so that I could access the mono eyes even after seam line removal.


IMPORTANT SB TIP!


I am not much of a scratch builder. In fact this is the year that I will try to practice my basic scratch building skills a little bit more. BUT I would like to share a tip out of observation.


Make sure that you clean up scratch built parts much more your detailing.


Notice that I stopped the scratch building at this stage of the build and blogged about it? See that the crotch part is totally clean already even without the use of putty?


Basically the tip is simple, make sure that the " base " shape is clean already before you move on to detailing. It is easier to sand and file simple square boxes before you add those tiny little details that you might over sand while trying to clean up initial mistakes and imperfections. Anyway this tip will be much clearer as you follow this project. Now here are some photos guys...


1/48 ZAKU project WIP photo


1/48 ZAKU project WIP photo


1/48 ZAKU project WIP photo


1/48 ZAKU project WIP photo


1/48 ZAKU project WIP photo


1/48 ZAKU project WIP photo


1/48 ZAKU project WIP photo


1/48 ZAKU project WIP photo

thumbnail

1/48 Unicorn Gundam head display by nuNUnu


1/48 Unicron Gundam head display by nuNUnu photo


It has been a while since I saw a finished masterpiece from Thailand's champion Gunpla builder nuNUnu. And I am very happy and pleased to announce that he has just shared and finished another beautiful build at our MAC forums.


This time nuNU played with a 1/48 Unicorn Gundam head and did a superb job on this little head display piece. nuNUnu is one of those scratch building machines and I am pretty sure this kinds of work for him is just like a warm up build. Looking forward to more of nuNU's awesome works in the future.


Anyways, a ton more photos of and discussion of this masterpiece at our MAC forums as usual. Here it is...


thumbnail

custom MG The O verDC23 wallpaper


custom MG The O verDC23 wallpaper photo


click image to enlarge


As customary I did a quick wallpaper of my most recent build in the MG The O. This is basically a conversion of the MG The O into a The O II Hauer that I used as entry in the Toymaker versus DC23 build off. The kit was inspired by the Hyper Weapon ( Kobayashi ) book given to me by Kenny ( Toymaker ) and was also inspired from Zluca's masterpieces of Kallamity.com.


I am just killing time as me and my daughter will be off to the awarding of the GBWC 2011 Philippines. But I will make sure to create a better wallpaper of this build soon. Feel free to share the wallpaper if you like. Thanks as always for dropping by! Til' next post guys! 
thumbnail

MG the O II Hauer conversion verDC23


custom MG The O verDC23 photo


First of all... thanks a ton to Kenny Lim aka Toymaker for making this project possible!


Before I start boring you with a lot of talk, here is the link to the summary of the work in progress of this project.


This is basically my entry for the Toymaker versus DC23 build off that I talked about in a lot of my older posts. The Toymaker versus DC23 build off is better explained HERE and HERE.


This was supposed to be my entry for the up coming Gunpla Builders World Cup 2011. However as I have won 4 times as Champion and 1 time as 1st runner up, I am basically disqualified in joining the Open category here in the Philippines since last year ( 2010 ). I will still be placing this link in my contest gallery though as this was originally planned for GBWC expert category anyways.


note: I abandoned the original diorama concept and threw away the diorama out of the window ( excluding the MG Gundam markII ) after the GBWC Philippines announcement. This year's expert category at GBWC will only accept OOTB builds, unlike last year when I won with my " Gilgamesh project ". I then did a quick simple base / diorama for a day ( yesterday ) just to improve the presentation of the whole project.


I wanted to challenge myself early this year when I thought of starting this project. I am not good at all with scratch building as evident in my older builds. My primitive skills in scratch building only allows me to do kit bash stuff and my usual mindless slapping of pla plates and kotobukiya parts.


I worked on this build for roughly 3 months total, but started really early on the basic shape of the butt. After managing to produce the scratched built butt, I abandoned the project as I had to work on a few commission builds. I was a little more confident that I could somehow pull off my first scratch built project after seeing how I did the butt.


I then revisited this project only less than a couple of months ago and tried to finish before my self imposed deadline.


I hand painted the whole kit with Vallejo and Citadel acrylic paints as I made a huge mistake on the salt technique a couple of weeks back, thus ruining the original air brushed painting. I enjoyed painting with the Vallejos as they went on very smooth and the colors are vibrant. So basically aside from being my first almost fully scratch built Gunpla... this is also my first almost fully hand painted master grade kit.


The build is still a bit crude and rough as I am not really that comfortable with scratch building. I am a Fine Arts graduate thus I love painting and weathering more than measuring and cutting plastics. But I am happy with the outcome! Never thought in any stage of the build that I could pull this project off.


I am a little more confident in my scratch building after this, although I must admit I am still not that comfortable. I will be finishing a couple of master grade kits ( commission works ) before the year ends and after those projects I will start in brainstorming my next contest build for 2012.


Anyways, here are a TON of photos of my MG The O II conversion...


custom MG The O verDC23 photo


custom MG The O verDC23 photo


custom MG The O verDC23 photo


custom MG The O verDC23 photo


custom MG The O verDC23 photo


custom MG The O verDC23 photo


custom MG The O verDC23 photo


custom MG The O verDC23 photo


custom MG The O verDC23 photo


custom MG The O verDC23 photo


custom MG The O verDC23 photo


custom MG The O verDC23 photo


custom MG The O verDC23 photo


custom MG The O verDC23 photo


custom MG The O verDC23 photo


custom MG The O verDC23 photo


custom MG The O verDC23 photo


custom MG The O verDC23 photo


custom MG The O verDC23 photo


custom MG The O verDC23 photo


custom MG The O verDC23 photo


custom MG The O verDC23 photo


custom MG The O verDC23 photo


custom MG The O verDC23 photo


custom MG The O verDC23 photo


custom MG The O verDC23 photo


custom MG The O verDC23 photo


custom MG The O verDC23 photo


custom MG The O verDC23 photo


custom MG The O verDC23 photo


custom MG The O verDC23 photo


custom MG The O verDC23 photo


custom MG The O verDC23 photo


custom MG The O verDC23 photo


custom MG The O verDC23 photo


custom MG The O verDC23 photo


custom MG The O verDC23 photo


custom MG The O verDC23 photo


custom MG The O verDC23 photo


Again thanks a ton to Kenny Lim aka Toymaker for making this project possibleand thanks as always for dropping by guys! Til' next year end project! :)


Powered by Blogger.